Samsung ML-1640 on Linux

I got my self a shiny new laser printer because the old Lexmark X1110 was getting old and giving little too many paper jams. I went with Samsung ML-1640 mainly because of it’s initial lower price, lower running costs and good reviews online. I had also read that the printer comes with Linux driver, that was one of the first I have seen.

To much to my surprise as soon as I plugged the printer Ubuntu recognized the printer and installed it, with in few seconds without any clicks or key presses the printer was ready for printing. I never bothered testing on Windows 7 but I’m sure I would have had to install drivers (Samsung claims it takes only 4 clicks).

However I ran to some trouble sharing the printer with Snow Leopard as the driver selected by Ubuntu needed to be used as a raw printer queue and I could get around how to set it up on Snow Leopard. Instead I flipped around the setup, I shared the printer as a raw printer queue and used the built in driver on Snow Leopard for the printer. I had to do the same for my notebook as well. Everything was working perfectly, finally πŸ™‚ . In the process I also figured out that Generic GDI driver works as long as the print job fits the printer memory (8 MB), if you send a larger job it will fail with nothing printed (but the printer receives the job).

For anyone wondering, on Linux the driver used is (automatically selected by Ubuntu) is Samsung ML-1640, SpliX V. 2.0.0 , which covers all capabilities of the printer (may be except for toner level).

I’m really happy with the printer, I think it was a very good purchase. I really like the idea the cartridge comes with a handle to push it into place. Then the fact that I can print the demo page by pressing and holding the reset/cancel button on the printer to get the toner level and other printer details. Only thing I miss is fully duplex printing, but with the lower cost I don’t mind working upto the printer to feed the paper when the printer is done printing one side of the pages.

Load balanced and High Availability cluster for your web site under USD 60 pm – Part 2

Update 2009-09-02: Now I’m using a single Linode and a Xen VPS from my very own hosting service. This means the VPSes have one less thing in common; hosting company.

As I promised, here is the post that will discuss in detail how I configured my cluster of 2 nodes to host my sites.

Setting up SSH tunnels

You have to setup a SSH tunnel between the nodes. In order to do that you need to allow restricted root logins into your nodes. Using your favourite text editor edit /etc/ssh/sshd_config and change the line PermitRootLogin to PermitRootLogin forced-commands-only.

Then generate SSH authentication keys for all your nodes and add the public keys to /root/.ssh/authorized_keys on other nodes. Keys can be generated by running ssh-keygen. By default your private key is stored in /root/.ssh/id_rsa and public key in /root/.ssh/id_rsa.pub. Your public key will look similar to bellow (Key shortened for brevity)

[source lang='plain' options='toolbar: false; gutter: false;' ]ssh-rsa AAAA...w== [email protected][/source]

To enable tunnel only access via root you need to add tunnel="0",command="/sbin/ifdown tun0;/sbin/ifup tun0" before your public key in /root/.ssh/authorized_keys. Your /root/.ssh/authorized_keys will look something like bellow.

[source lang='plain' options='toolbar: false; gutter: false;' ]tunnel='0',command='/sbin/ifdown tun0;/sbin/ifup tun0' ssh-rsa AAAA...w== [email protected][/source]

Now setup the actual tunnel. Add following lines to /etc/network/interfaces in the “server”

[source lang='plain']
auto tun0
iface tun0 inet static
address 10.100.2.1
netmask 255.255.255.0
pointopoint 10.100.2.2
[/source]

and the following in the “client”

[source lang='plain']
auto tun0
iface tun0 inet static
pre-up ssh -S /var/run/ssh-myvpn-tunnel-control -M -f -w 0:0 example.com true
pre-up sleep 5
address 10.100.2.2
pointopoint 10.100.2.1
netmask 255.255.255.0
up route add -net 10.100.2.0 netmask 255.255.255.0 gw 10.100.2.0 tun0
post-down ssh -S /var/run/ssh-myvpn-tunnel-control -O exit example.com
[/source]

Now you only have to restart networking to enable the tunnel. Now your nodes will be in their own VPN.

Setting up document root replication (rsync)

Share /var/www via rsync. You need to install rsync and add following to /etc/rsyncd.conf if they are not already there.

[source lang='plain']max connections = 2
log file = /var/log/rsync.log
timeout = 300

[www]
comment = DOC Root
path = /var/www
read only = yes
list = yes
uid = www-data
gid = www-data
auth users = replicator
secrets file = /etc/rsyncd.secrets[/source]

Add following cron jobs to www-data crontab (crontab -e)

[source lang='plain' options='gutter: false; toolbar: false;' ]
1/10 * * * * test -r /tmp/rsync.docroot.lock || touch /tmp/rsync.docroot.lock && rsync -aP rsync://[email protected]/www/ /var/www/ --password-file=/etc/rsync.secrets --contimeout=30 > /dev/null 2>1 && rm /tmp/rsync.docroot.lock[/source]

Setting up session_mysql

Next let us setup session_mysql such that we can forget about replicating PHP session πŸ™‚ .

Install php5-dev and libmysql++-dev, download session_mysql and extract it, running following commands as root within the extracted location.

[source lang='bash']export PHP_PREFIX='/usr'
$PHP_PREFIX/bin/phpize
./configure --enable-session-mysql --with-php-config=$PHP_PREFIX/bin/php-config --with-mysql=$PHP_PREFIX
make
make install[/source]

Create the database to store the session data with the following SQL

[source lang='sql']
create database phpsession;
grant all privileges on phpsession.* to phpsession identified by 'phpsession'; -- CHANGE DEFAULT PASSWORD
create table phpsession(
sess_key char(64) not null,
sess_mtime int(10) unsigned not null,
sess_host char(64) not null,
sess_val mediumblob not null,

index i_key(sess_key(6)),
index i_mtime(sess_mtime),
index i_host(sess_host)
);[/source]

Add the following to your php.ini (or /etc/php5/conf.d/session_mysql.ini)

[source lang='plain']
session.save_handler = 'mysql'
session_mysql.db='host=localhost db=phpsession user=phpsession pass=phpsession'
[/source]

Do not forget to change the default password. Restart Apache or Lighttpd (or any other web server you are using).

MySQL asynchronous two way replication

I’m sure some of you are asking why I went for asynchronous replication. Main reasons being flexibility and lack of nodes (My cluster is just 2 nodes).

Stop MySQL from listening only to local connections. Remember to review your user table (mysql.user) to make sure you don’t grant wild card access like 'user'@'%'. Comment out bind-address in/etc/mysql/my.cnf in all nodes. Then add following to node1

[source lang='plain']server-id = 1
replicate-same-server-id = 0
auto-increment-increment = 2
auto-increment-offset = 1
log_bin = /var/log/mysql/mysql-bin.log
expire_logs_days = 10
max_binlog_size = 100M

master-host = 10.100.2.2
master-user = slave_user_0
master-password = your$password
master-connect-retry = 60[/source]

and following to node2

[source lang='plain']server-id = 2
replicate-same-server-id = 0
auto-increment-increment = 2
auto-increment-offset = 2
log_bin = /var/log/mysql/mysql-bin.log
expire_logs_days = 10
max_binlog_size = 100M

master-host = 10.100.2.1
master-user = slave_user_1
master-password = your$password
master-connect-retry = 60[/source]

Now create the users only granting them with replication rights. Also make sure you specify the hostname or the IP to make sure someone is not offloading your data πŸ˜€ . Following SQL will create the users given in the example. You will have to run the command in both nodes as the data in either node is identical.

[source lang='sql']CREATE USER 'slave_user_1'@'10.100.2.1' IDENTIFIED BY 'your$password';

GRANT REPLICATION SLAVE ON * . * TO 'slave_user_1'@'10.100.2.1' IDENTIFIED BY 'your$password' WITH MAX_QUERIES_PER_HOUR 0 MAX_CONNECTIONS_PER_HOUR 0 MAX_UPDATES_PER_HOUR 0 MAX_USER_CONNECTIONS 0 ;

CREATE USER 'slave_user_2'@'10.100.2.2' IDENTIFIED BY 'your$password';

GRANT REPLICATION SLAVE ON * . * TO 'slave_user_2'@'10.100.2.2' IDENTIFIED BY 'your$password' WITH MAX_QUERIES_PER_HOUR 0 MAX_CONNECTIONS_PER_HOUR 0 MAX_UPDATES_PER_HOUR 0 MAX_USER_CONNECTIONS 0 ;[/source]

Now start MySQL and run following in mysql prompt on each of the nodes.

[source lang='sql']reset master;
stop slave;
start slave;[/source]

Finally

Now you have a cluster of 2 nodes where you can run your PHP site. Your databases are replicated, your user session data is replicated and your document root is replicated. Have fun, if you have issues please post it as a comment.
Use KernelCheck to build the latest kernel for debian/ubuntu

I recently found this awesome project called KernelCheck that allows you to build the latest Linux Kernel for your distribution. It requires very little interaction from the user and automatically optimizes the kernel to user’s needs. Currently it only supports Debian based distributions but support for RPM and Slackware based distributions is planned. KernelCheck is build around the AutoKernel idea by PinguinZ.

Building the Linux Kernel was never easier on Debian (and derivatives) before. I just compiled the 2.6.28.1, it wasn’t a pain at all.

v4l supports Avermedia PCI pure analog (M135A)

I bought a Avermedia PCI pure analog (M135A) recently (26th December) and to much to my delight it was just plug and play on my home media center running Debian testing with custom built Linux kernel 2.6.28 (Released on 24th December). TV tuner was working with no issues. All local TV channels we accessible :).Β  Even the remote was working (not all but the most critical ones like volume control and channel selection are working). Since my sound card didn’t have a mixer I had to use sox to redirect the sound from the TV tuner to the sound card. Running the following at start up did the job.

sox -r 32000 -w -t alsa hw:1,0 -t alsa hw:0,0

Just in case not all required modules are loaded in your case, the required modules to use this radio tuner are:

  • saa7134
  • saa7134_alsa
  • tda827x
  • tda8290

I’m really happy that now most of the hardware I can find in local shop is just plug and play on GNU/Linux. My kudos to v4l (video4linux) and the Linux kernel developers πŸ™‚ .

CUPS spool in devices with limited space

I was trying to print a large document, and it would never print. A small print job had no issues. To add to that I was printing a stupid PDF form that will only open with Acrobat Reader. The print job was passing through many places, VMWare guest, my notebook, and finally print server. I spent hours looking for what’s wrong.

Finally after many hours lost the issue was found to be lack of storage space in the print server; specifically print job spool was filling the disk.

I was unable to find a work around or a fix other than printing in smaller batches. I believe not many people come across this issue, IMHO this is not even worth fixing. I just blogged it for my own reference.

Going multi uplink

Last Friday I got a 2nd connection for my home-office. Now I have 1Mbit/s WiMAX uplink from Dialog Broadband and 512Kbit/s (Soon will be upgraded to 1Mbit/s) WiMAX uplink from Lanka Bell.

I have setup one of my old PCs as the router. I couldn’t find a single router with multi-uplink here in Sri Lanka, but PC router is more flexible, IMO. I’m running Debian on the router and using Shoreline Firewall aka Shorewall for firewalling and traffic shaping/control. It took a good few hours to setup mainly because I mixed up the ethernet interfaces πŸ˜€ . Shorewall documentation on multiple internet connections and traffic shaping/control by Tom Eastep helped me a lot in setting up my router.

Get Monit to repair your server!

Monit is an open source utility for managing and monitoring, processes, files, directories and filesystems on a UNIX system. Monit is capable of automatic maintenance and repair and can execute meaningful causal actions in error situations. It takes less than 15 minutes to setup and run this wonderful tool on most Unix servers. It also comes with a buit in web based service manager.

I personally prefer Monit over Nagios or ZABBIX. They are pain to install and not as flexible as Monit. AFAIK, Nagios only notifies and records events. It is unable to take a casual maintainance action such as restarting the service.

You will find some useful Monit scripts here.

My Kudos to the Monit team. I’m one happy Monit user πŸ™‚

Ubuntu 8.10 on Lenovo 3000 N200

Few hours ago I upgraded my Ubuntu 8.04 to 8.10. Upgrade it self was a smooth one. Download took around 1.5 hours and the installation was around 45 minutes. Ubuntu 8.10 Human theme looks sexy. New wireless driver for Intel 3945ABG has support for the LED indicator as well.

Only issues were:

  1. ALSA was locked while it’s being used by any application.
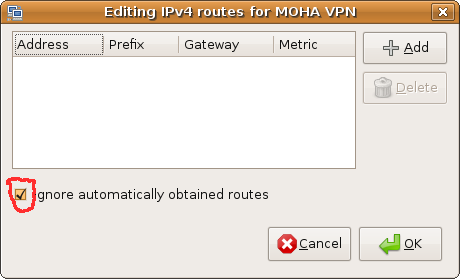
  2. OpenVPN Client was not routing all traffic through the tunnel (There was no obvious option to do add the routes in the NetworkManager)

ALSA issue was fixed with almost no effort but the solution for the OpenVPN client issue was not so obvious (at least for me).

Adding the following line to /etc/modprobe.d/alsa-base fixed the ALSA locking issue.

options snd-hda-intel model=lenovo

In NetworkManager 0.7 all traffic will not be routed through the tunnel if the OpenVPN serve pushes any routes or all of the rules that are pushed through are ignored. You can make NetworkManager to route all traffic through the tunnel by pushing a route similar to 0.0.0.0 0.0.0.0 gw 172.16.1.5 by adding a line similar to bellow to /etc/openvpn/openvpn.conf in the OpenVPN server

push "route 0.0.0.0 0.0.0.0 gw 172.16.1.5"

or by making NetworkManager to ignore all routes pushed from the server. Check the “Ignore automatically obtained routes” checkbox in the Routes dialog in the VPN editing dialog (IPv4 Setting).

That’s it and my notebook is working better than it was before the upgrade. πŸ™‚

References: http://bugzilla.gnome.org/show_bug.cgi?id=552594 | https://bugs.launchpad.net/ubuntu/+source/linux-source-2.6.22/+bug/136810

One more day for Ubuntu 8.10 release

Ubuntu 8.10 named Intrepid Ibex will be released on 30th October 2008. I’m looking forward for the release tomorrow. I’ll be upgrading my machines to Ibex. New features in 8.10 are:


Ubuntu 8.10 is here

  • GNOME 2.24
  • X.Org 7.4
  • Linux kernel 2.6.27
  • Encrypted private directory
  • Guest session
  • Network Manager 0.7
  • Samba 3.2
  • PAM authentication framework
  • Totem BBC plugin
  • Server Virtualization

There is more, you can check out http://www.ubuntu.com/testing/810rc.

Duplicity chokes on OSError: [Errno 24] Too many open files

It was little bit too scary. Duplicity backup scripts were failing on the EC2 instances again, this time around it was not about not able to reach S3, but having too many files open. That was weird because it didn’t give such a error in the past. However the work around was to increase the maximum number of file descripters allowed for the user that was running the backup script.

How ever finding this solution was tought, actually it was a FreeBSD forum that had the solution. I though I would just write it down for Linux.

Step 1: Find out the current limit

To find out the current file descripter limit for a given use, log in as the particular user and run the following command.

 $ ulimit -n

By default on Debian it would be 1024.

Step 2: Increase the limit

You would have to edit /etc/security/limits.conf. You will find details on how to setup different limits in limits.conf itself. The record that you have to put in should look like the following.

username hard nofile 2048

Step 3: Log out and Log back in

You would have to log out and log back in as the user that we updated the file descripter limit. Then run the following command.

 $ ulimit -n

You should see the updated file descripter limit.

Hope this helps someone like me in desperation to get the backups in track. I would be doing more investigation as to why there are so many files open. If I find anything interesting I would definitely blog about it. Also for everyone’s reference there is a bug filed at the Savanah bug tracker by someone else who ran into the same issue